NGINX Proxy Manager
On this page
NGINX Proxy Manager is supported by Authelia. It’s a NGINX proxy with a configuration UI.
Important: When using these guides, it’s important to recognize that we cannot provide a guide for every possible method of deploying a proxy. These guides show a suggested setup only, and you need to understand the proxy configuration and customize it to your needs. To-that-end, we include links to the official proxy documentation throughout this documentation and in the See Also section.
Get started
It’s strongly recommended that users setting up Authelia for the first time take a look at our Get started guide. This takes you through various steps which are essential to bootstrapping Authelia.
Requirements
NGINX Proxy Manager supports the required NGINX requirements for Authelia out-of-the-box.
Trusted Proxies
Important: You should read the Forwarded Headers section and this section as part of any proxy configuration. Especially if you have never read it before.
To configure trusted proxies for NGINX Proxy Manager see the NGINX section on Trusted Proxies. Adapting this to NGINX Proxy Manager is beyond the scope of this documentation.
Assumptions and Adaptation
This guide makes a few assumptions. These assumptions may require adaptation in more advanced and complex scenarios. We can not reasonably have examples for every advanced configuration option that exists. Some of these values can automatically be replaced with documentation variables.
The following are the assumptions we make:
- Deployment Scenario:
- Single Host
- Authelia is deployed as a Container with the container name
autheliaon port9091 - Proxy is deployed as a Container on a network shared with Authelia
- The above assumption means that Authelia should be accessible to the proxy on
http://authelia:9091and as such:- You will have to adapt all instances of the above URL to be
https://if Authelia configuration has a TLS key and certificate defined - You will have to adapt all instances of
autheliain the URL if:- you’re using a different container name
- you deployed the proxy to a different location
- You will have to adapt all instances of
9091in the URL if:- you have adjusted the default port in the configuration
- You will have to adapt the entire URL if:
- Authelia is on a different host to the proxy
- You will have to adapt all instances of the above URL to be
- All services are part of the
example.comdomain:- This domain and the subdomains will have to be adapted in all examples to match your specific domains unless you’re just testing or you want to use that specific domain
Docker Compose
The following docker compose example has various applications suitable for setting up an example environment.
---
networks:
  net:
    driver: 'bridge'

services:
  nginx:
    container_name: 'nginx'
    image: 'jc21/nginx-proxy-manager'
    restart: 'unless-stopped'
    networks:
      net:
        aliases: []
    ports:
      - '80:80'
      - '81:81'
      - '443:443'
    volumes:
      - '${PWD}/data/nginx-proxy-manager/data:/data'
      - '${PWD}/data/nginx-proxy-manager/letsencrypt:/etc/letsencrypt'
      - '${PWD}/data/nginx/snippets:/snippets'
    environment:
      TZ: 'Australia/Melbourne'
  authelia:
    container_name: 'authelia'
    image: 'authelia/authelia'
    restart: 'unless-stopped'
    networks:
      net:
        aliases: []
    volumes:
      - '${PWD}/data/authelia/config:/config'
    environment:
      TZ: 'Australia/Melbourne'
  nextcloud:
    container_name: 'nextcloud'
    image: 'lscr.io/linuxserver/nextcloud'
    restart: 'unless-stopped'
    networks:
      net:
        aliases: []
    volumes:
      - '${PWD}/data/nextcloud/config:/config'
      - '${PWD}/data/nextcloud/data:/data'
    environment:
      PUID: '1000'
      PGID: '1000'
      TZ: 'Australia/Melbourne'
  whoami:
    container_name: 'whoami'
    image: 'docker.io/traefik/whoami'
    restart: 'unless-stopped'
    networks:
      net:
        aliases: []
    environment:
      TZ: 'Australia/Melbourne'
...
Configuration
Assumptions
Important: Our examples make assumptions about your configuration. These assumptions represent sections that either most likely require an adjustment, or may require an adjustment if you’re not configuring it in the same way.
- The domain for Authelia is
auth.example.comwhich should be adjusted in all examples and snippets to your actual domain. - The required configuration snippets are mounted in the container or otherwise available in the
/snippets/directory. If you choose a different directory, you’re required to adjust every instance of/snippets/appropriately to your needs. - You have not configured the Authelia configuration YAML with a server TLS certificate/key.
- You are running Authelia on the default port.
- You are running Authelia with the
container_nameofautheliaor the Authelia process is otherwise resolvable by NGINX Proxy Manager asauthelia. - If you want to use a Custom Location and wish for it to be protected, you should follow the Protected Application Custom Location guide.
Snippets
The examples assume you’ve mounted a volume containing the relevant
NGINX Snippets from the NGINX Integration Guide. The
suggested snippets are the proxy.conf, authelia-location.conf, and authelia-authrequest.conf. It may be fine to
substitute the standard variant of the proxy.conf for the headers only variant but this is untested. You will need websocket.conf if any protected applications require websockets.
These snippets make the addition of a protected proxy host substantially easier.
Authelia Portal
The Authelia portal requires minimal configuration.
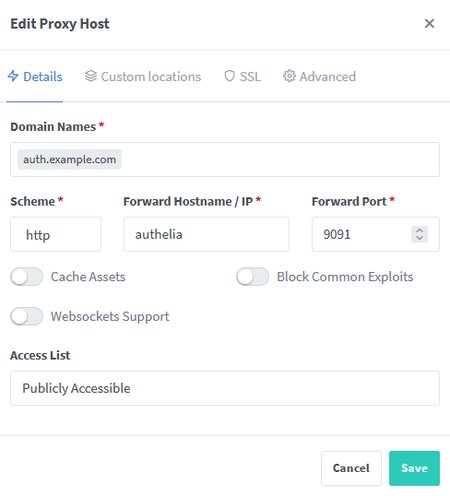
- Create a new
Proxy Host. - Set the following items in the
Detailstab:- Domain Names:
auth.example.com - Scheme:
http - Forward Hostname / IP:
authelia - Forward Port:
9091
- Domain Names:
- Configure your
SSLtab to:- Serve a valid certificate.
- Force SSL:
true
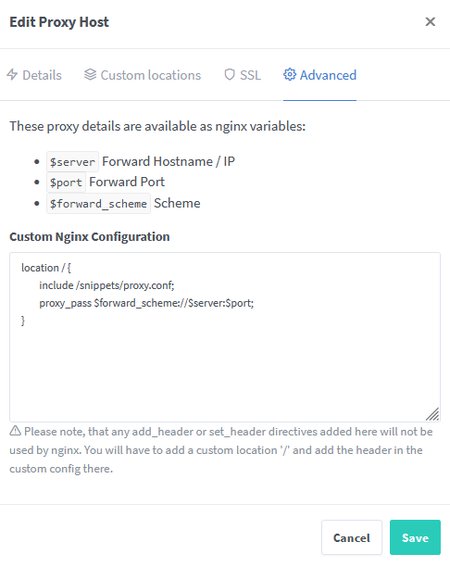
- Configure your
Advancedtab:
location / {
    include /snippets/proxy.conf;
    proxy_pass $forward_scheme://$server:$port;
}
Authelia Portal Screenshots
Authelia Portal Details tab example:
Authelia Portal Advanced tab example:
Protected Application
The following example shows how to configure a protected application. We often use Nextcloud for such examples.
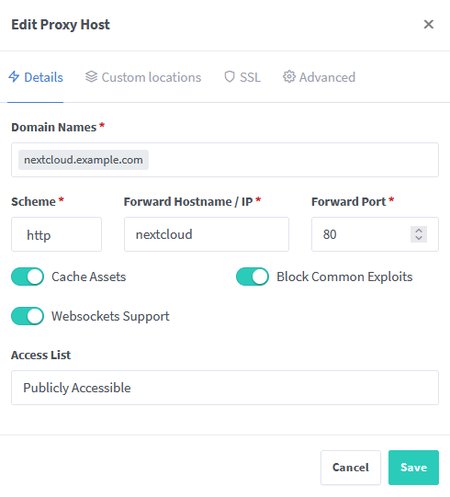
- Create a new
Proxy Host. - Set the following items in the
Detailstab:- Domain Names:
nextcloud.example.com - Scheme:
http - Forward Hostname / IP:
nextcloud - Forward Port:
80
- Domain Names:
- Configure your
SSLtab to:- Serve a valid certificate.
- Force SSL:
true
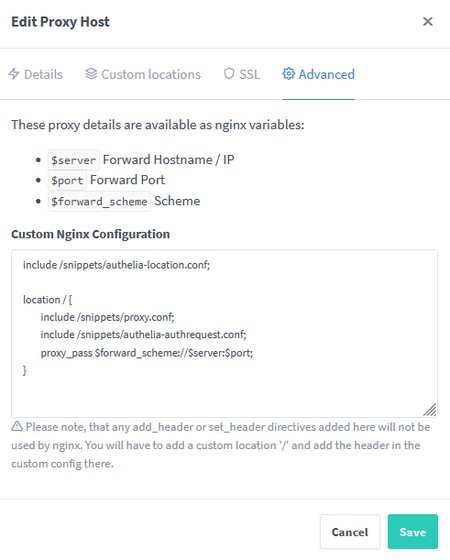
- Configure your
Advancedtab:
include /snippets/authelia-location.conf;

location / {
    include /snippets/proxy.conf;
    include /snippets/authelia-authrequest.conf;
    proxy_pass $forward_scheme://$server:$port;
}
Websockets
Note that because we are using the advanced configuration tab, the switches on the Details tab will have no effect. If websockets are required for a protected application, you must include the websocket.conf from the NGINX Snippets.
Protected Application Screenshots
Protected Application (Nextcloud) Details tab example:
Protected Application (Nextcloud) Advanced tab example:
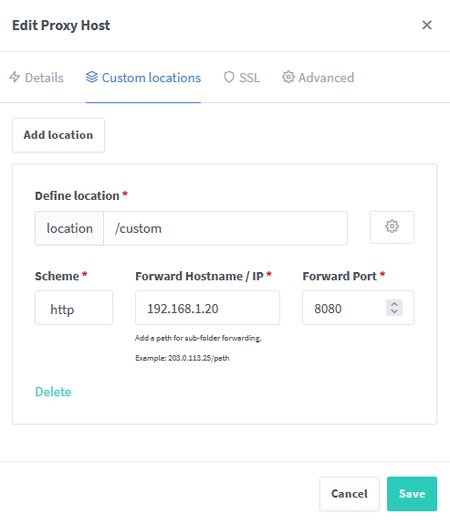
Protected Application Custom Locations
It’s important to note if you define locations in the Custom Locations tab of a proxy host that they will not be
checked with Authelia for authorization effectively bypassing the authorization policies you implement. If you want a
custom location then you can also define this in the advanced tab.
To replicate the Custom Location tab below a location block can be ADDED to the
Protected Application Advanced tab:
location /custom {
    include /snippets/proxy.conf;
    include /snippets/authelia-authrequest.conf;
    proxy_pass http://192.168.1.20:8080;
}
Proxy Hosts Screenshot
The following screenshot shows an example of following the directions for the Authelia Portal and two applications:
