Proxmox
Proxmox
This integration guide is community supported. It's not guaranteed to be complete, accurate, or up-to-date. It's likely that if this integration guide does not work for you that changes occurred with a third-party application.
Important Note: This documentation is version specific. Make sure you check the section outlining the tested versions.
Important Note: We always recommend users read the third-party documentation as part of the integration process to ensure configuration elements matches their needs. As such the See Also section is likely to have important links.
Important Note: If you find an error in this documentation please make a Pull Request, start a Discussion, or contact us on a Chat Room.
Tested Versions
Before You Begin
Important Reading
This section contains important elements that you should carefully consider before configuration of an OpenID Connect 1.0 Registered Client.
Common Notes
- The OpenID Connect 1.0
client_idparameter:- This must be a unique value for every client.
- The value used in this guide is merely for readability and demonstration purposes and you should not use this value in production and should instead utilize the How do I generate a client identifier or client secret? FAQ. We recommend 64 random characters but you can use any arbitrary value that meets the other criteria.
- This must only contain RFC3986 Unreserved Characters.
- This must be no more than 100 characters in length.
- The OpenID Connect 1.0
client_secretparameter:- The value used in this guide is merely for demonstration purposes and you should absolutely not use this value in production and should instead utilize the How do I generate a client identifier or client secret? FAQ.
- This string may be stored as plaintext in the Authelia configuration but this behaviour is deprecated and is not guaranteed to be supported in the future. See the Plaintext guide for more information.
- When the secret is stored in hashed form in the Authelia configuration (heavily recommended), the cost of hashing can, if too great, cause timeouts for clients. See the Tuning the work factors guide for more information.
- The configuration example for Authelia:
- Only contains an example configuration for the client registration and you MUST also configure the required elements from the OpenID Connect 1.0 Provider Configuration guide.
- Only contains a small portion of all of the available options for a registered client and users may wish to configure portions that are not part of this guide or configure them differently, as such it’s important to both familiarize yourself with the other options available and the effect of each of the options configured in this section by looking at the OpenID Connect 1.0 Clients Configuration guide.
Specific Notes
Important Note
Proxmox requires you create the Realm before adding the provider. This is not covered in this guide.
Assumptions
This example makes the following assumptions:
- Application Root URL:
https://proxmox.example.com/ - Authelia Root URL:
https://auth.example.com/ - Client ID:
proxmox - Client Secret:
insecure_secret - Realm
authelia
Some of the values presented in this guide can automatically be replaced with documentation variables.
Configuration
Authelia
The following YAML configuration is an example Authelia client configuration for use with Proxmox which will operate with the application example:
identity_providers:
  oidc:
    ## The other portions of the mandatory OpenID Connect 1.0 configuration go here.
    ## See: https://www.authelia.com/c/oidc
    clients:
      - client_id: 'proxmox'
        client_name: 'Proxmox'
        client_secret: '$pbkdf2-sha512$310000$c8p78n7pUMln0jzvd4aK4Q$JNRBzwAo0ek5qKn50cFzzvE9RXV88h1wJn5KGiHrD0YKtZaR/nCb2CJPOsKaPK0hjf.9yHxzQGZziziccp6Yng'  # The digest of 'insecure_secret'.
        public: false
        authorization_policy: 'two_factor'
        require_pkce: true
        pkce_challenge_method: 'S256'
        redirect_uris:
          - 'https://proxmox.example.com'
        scopes:
          - 'openid'
          - 'profile'
          - 'email'
        response_types:
          - 'code'
        grant_types:
          - 'authorization_code'
        access_token_signed_response_alg: 'none'
        userinfo_signed_response_alg: 'none'
        token_endpoint_auth_method: 'client_secret_basic'
Application
To configure Proxmox there is one method, using the Web GUI.
Web GUI
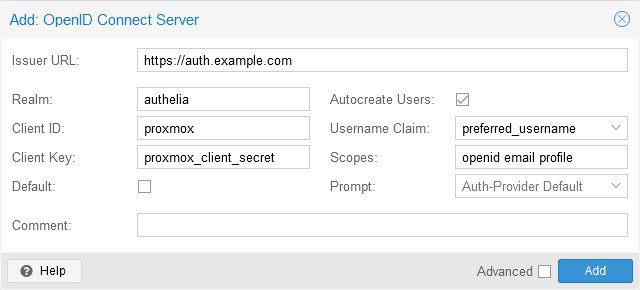
To configure Proxmox to utilize Authelia as an OpenID Connect 1.0 Provider, use the following instructions:
- Visit Datacenter.
- Visit Permission.
- Visit Realms.
- Add an OpenID Connect Server.
- Configure the following options:
- Issuer URL:
https://auth.example.com - Realm:
authelia - Client ID:
proxmox - Client Key:
insecure_secret - Username Claim
preferred_username - Scopes:
openid profile email - Autocreate Users: Enable if you want users to automatically be created in Proxmox.
- Issuer URL:
